FROM EMILY | Festive Paper Cuts


Today, we’re thrilled to welcome the endlessly talented Emily from Good Things, who is here to share a festive and creative paper-cutting tutorial. An enthusiastic crafter, dedicated blogger, and dachshund wrangler, Emily lives in Seoul with her wonderful husband, two charming long dogs, occasional step-sons, an abundance of teapots, and an even greater number of owls. Her workspace might be buried under paper, photos, and travel plans, but her creativity is always soaring.
Let Emily take you on a journey into the art of paper cutting—not the accidental nicks from unwrapping gifts too quickly, but the deliberate, beautiful craft of transforming paper into decorative masterpieces.
The Joy of Paper Cutting
Paper cutting is a delightful craft that offers immediate satisfaction and endless possibilities. Once you’ve crafted your design, it can be transformed into an array of decorative items: from present toppers and cards to garlands and even tree ornaments.
Many of you may have dabbled in paper cutting during your school days—remember those paper snowflakes?—but today, Emily will refresh those skills and inspire new ideas.
Gathering Your Supplies
To start, you’ll need:
- Pretty paper (origami paper works wonderfully, but feel free to experiment)
- Pencil
- Scissors
- Craft knife
- Cutting mat
- Stapler
- And, if you’re as clumsy as I am, a well-stocked first aid kit might come in handy too!
Step-by-Step Guide to Festive Paper Cuts
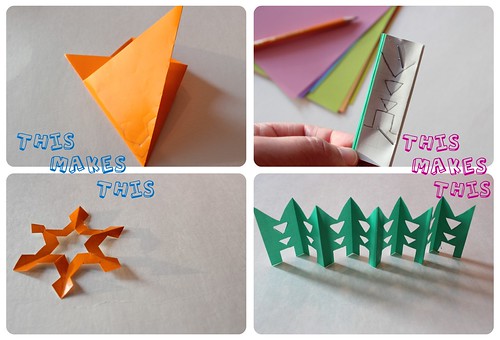
Step 1: Fold Your Paper
For a classic snowflake or star design, begin with a square and fold it into triangles. The number of folds will determine the points on your design—four folds for a four-pointed snowflake, and so forth. For an alternative, check out a tutorial for a five-pointed snowflake by How About Orange, or explore six-pointed designs with additional style tips.
If you’re aiming for a banner or horizontal design, simply fold your paper accordion-style.
Step 2: Design and Cut
You can cut freestyle or sketch a design on your folded paper. For a festive touch, try drawing stylized Christmas trees. Ensure your design connects from one edge of the paper to the other to avoid creating mere confetti.
If stability is a concern, staple the folds together—just make sure to staple parts that will be discarded. Then, cut out your design, using the craft knife for any intricate details or internal shapes.
Step 3: Unveil and Decorate
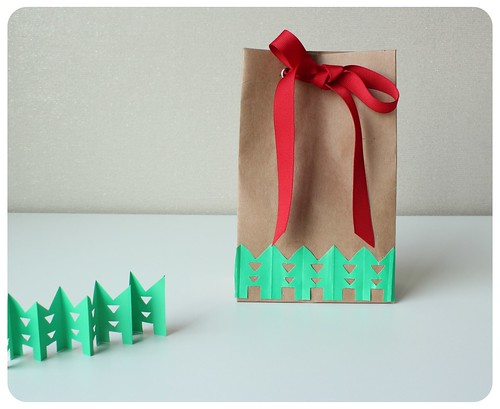
Carefully unfold your creation to reveal a delicate paper cut ready to beautify your holiday gifts or home decor. Emily loves using her paper cuts to embellish gifts and is even planning to make a supersized banner paper cut with giant crepe paper for the holidays.
Explore More
For those who crave even more creativity:
- Visit the sidebar at Paper Snowflakes for a treasure trove of free printable patterns for crafting various snowflake designs.
- Delve into the wonderful world of paper cutting books. Emily’s favorite, “Kawai Kirigami Recipe,” is a Japanese gem brimming with gorgeous designs, practical usage ideas, and it even includes a CD with ready-to-print patterns.
A big thank you to Emily for sharing this simple yet stunning way to jazz up a plain bag or gift with gorgeous paper-cut Christmas trees!
Emily’s tutorial reminds us that with just a few folds and cuts, you can transform a simple sheet of paper into a stunning piece of art. It’s a wonderful way to bring a personal, crafted touch to your holiday celebrations, making each decoration a special part of the season’s joy.